Are your Systeme.io emails getting kicked in the butt and landing in the spam folder instead of getting straight to your recipients’ inboxes? If that is the case, the problem isn’t with your account, but your domain authentication.
What is Domain Authentication?
Domain authentication is a process of verifying whether an email message is linked or associated with a claimed domain and if the sender has access or permission to use that domain.
Domain Authentication in Systeme.io
If you’re using a custom domain in Systeme.io, you will have to authenticate it. This process is necessary to prove ownership of your domain, and also prove to email providers that Systeme.io is authorized to send emails on your behalf.
It is like giving the platform a digital passport that allows it to use your domain’s email as the sender for your campaigns and newsletters.
How Systeme.io Domain Authentication Works
Systeme.io uses three main standard authentication protocols that allow you to add specific records to your domain’s DNS (Domain Name Server) settings.
Here are the protocols.
Picture this:
I sent a friendship card to my friend. That card has to pass through the post office (which is the recipient’s email server) for verification before my friend can receive it. Now, the post office has to check for these two things:
- The card truly came from my house (my domain).
- I have granted permission to the email carrier, such as Systeme.io or Mailchimp, to deliver the card after pickup.
If the post office (the recipient’s email server) is unable to verify these things, they suspect something isn’t right and trash my card in the “junk mail” bin (the spam folder).
Domain authentication is how you show that your email is legitimate. You earn the trust of the post office (recipient’s email server) by putting three special “tags” on your house (Your Domain’s DNS records), which are SPF—Sender Policy Framework, DKIM—DomainKeys Identified Mail, and DMARC—Domain-based Message Authentication, Reporting & Conformance.
SPF: It shows the list of authorized IP addresses and mail servers that can send email on behalf of your domain. It does that through the use of a DNS record. SPF means Sender Policy Framework.
DKIM: It assigns a header signature for every outgoing email. It uses private keys (cryptographic keys) to tag the email. The receiving server uses the key to verify the signature that shows the email hasn’t been compromised and is really coming from the claimed domain. It is like a wax seal that you can put on an email that shows it hasn’t been tampered with.
DMARC: It unifies SPF and DKIM, sets a policy for failed checks, and also acts as a gatekeeper that tells the recipient server what to do when an email fails verification checks. This feature determines if an email message is immediately trashed or sits in the spam folder. A warning notification is sent to the real domain owner for monitoring.
How to Authenticate Your Domain in Systeme.io
Log in to your systeme.io account.
In the navigation menu, go to your profile icon (where your profile picture is) and click the dropdown icon, and select “settings.”
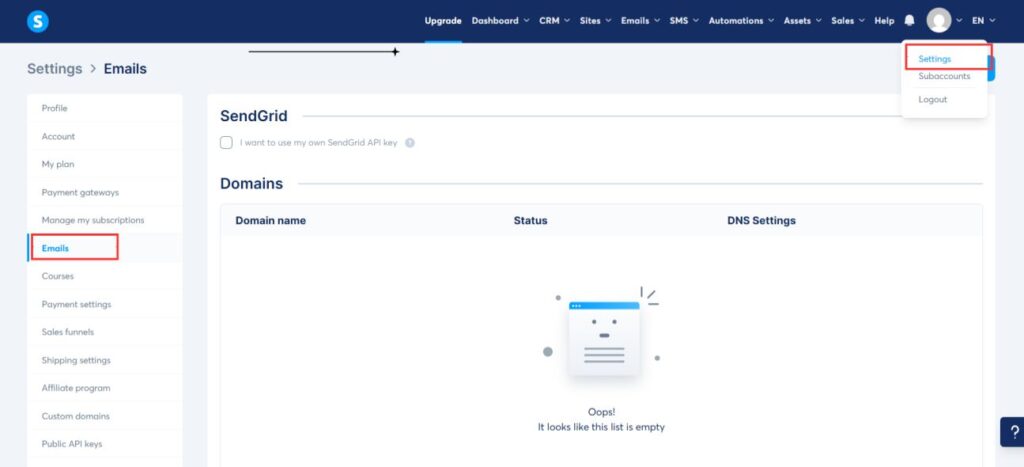
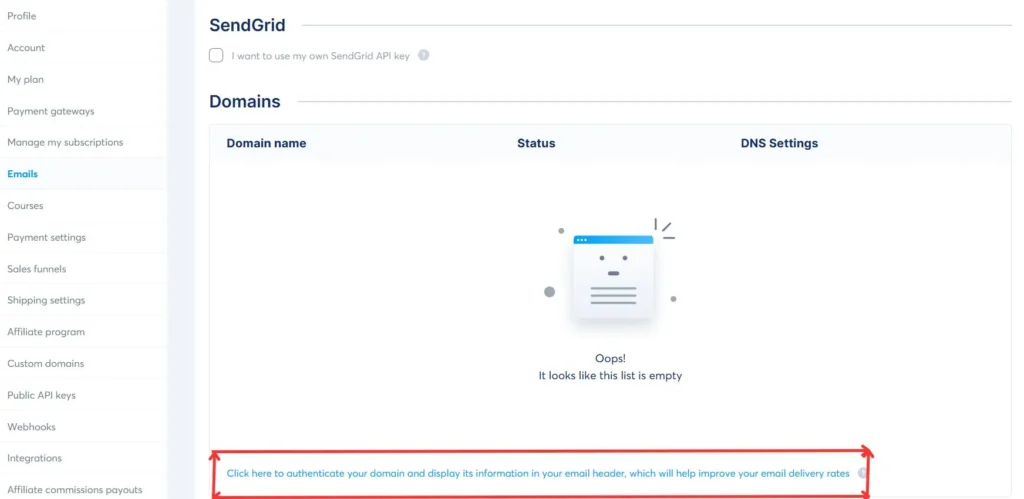
In the “Domains” section, click the sentence that reads, “Click here to authenticate your domain and display its information in your email header, which will help improve your email delivery rates”
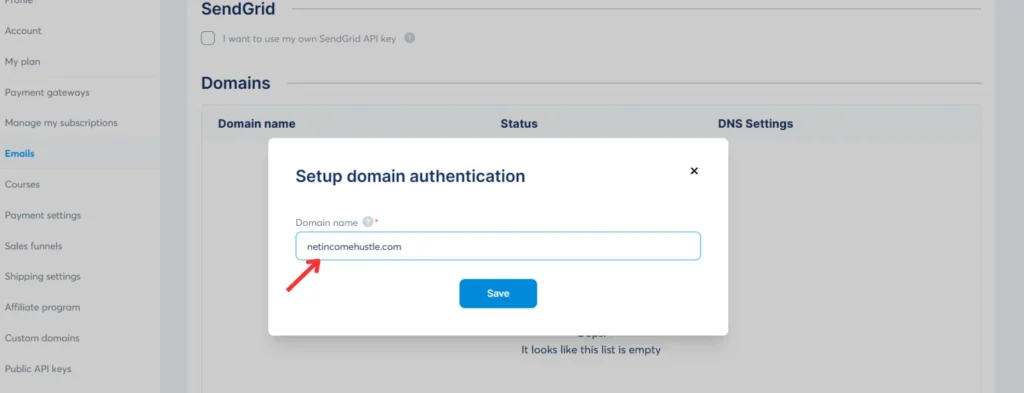
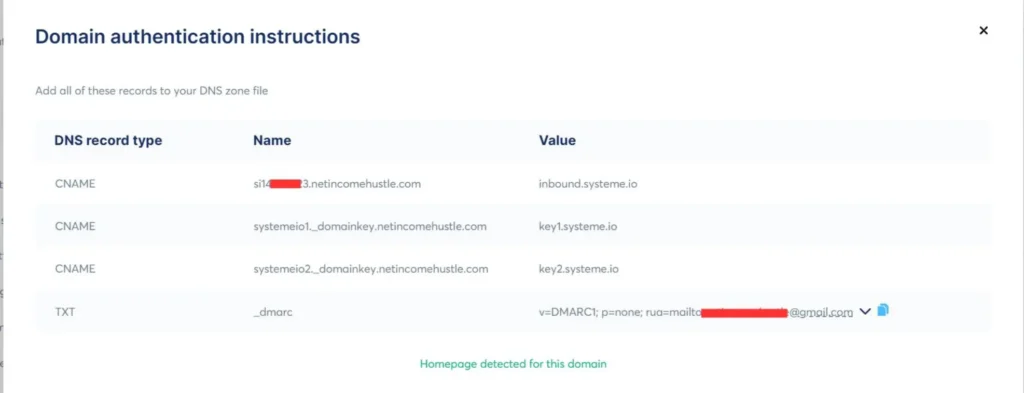
When clicked, you’ll see a pop-up. Enter your domain name without “www.” Thereafter, click save to generate the three (3) CNAME records and one (1) DMARC record.
The domain used for this illustration is “netincomehustle.com”
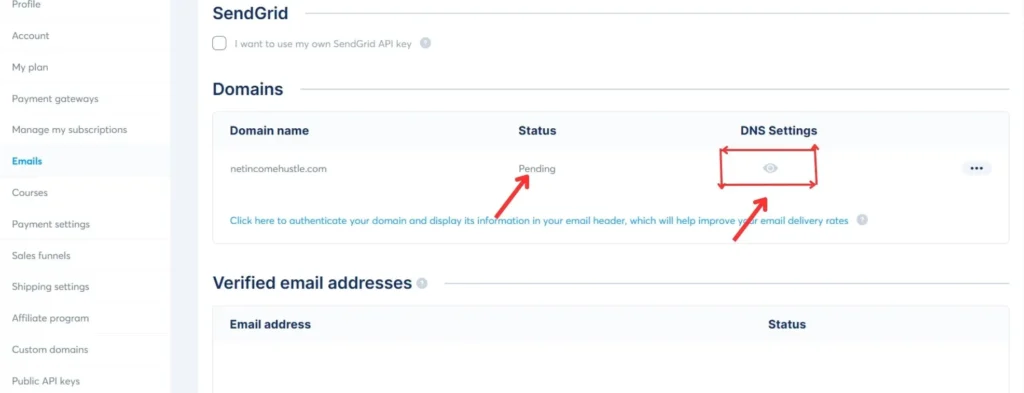
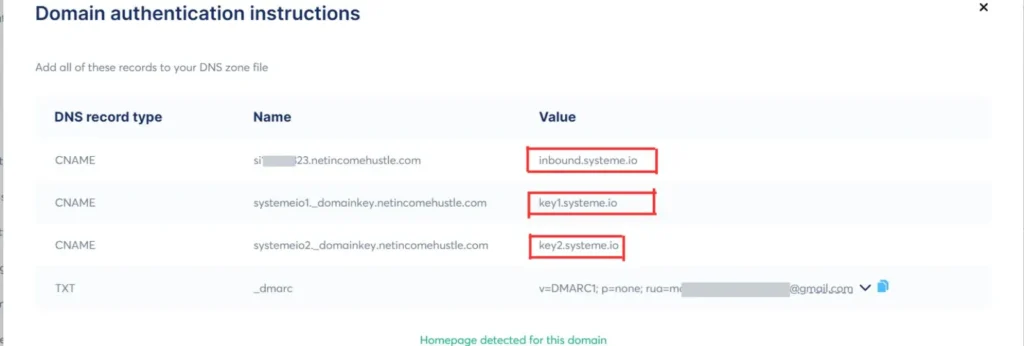
Once the records are generated, the status of your domain will show pending. Locate the eye icon below the DNS settings, click on it and your records will show.
Please ensure you copy each record accurately and add them to your domain host, such as Namecheap, Google Domains, or Hostinger.
Note: the process is the same for all hosting services/platforms.
You must also understand that it is necessary for email sending; hence, your email message won’t arrive to your recipient’s inbox.
Here’s how to add the records to the DNS settings of the site that hosts your domain.
Log in to your hosting account. In this post, I am using Namecheap hosting.
By now, you must have copied the 3 CNAME records and 1 TXT record, also known as the DMARC record.
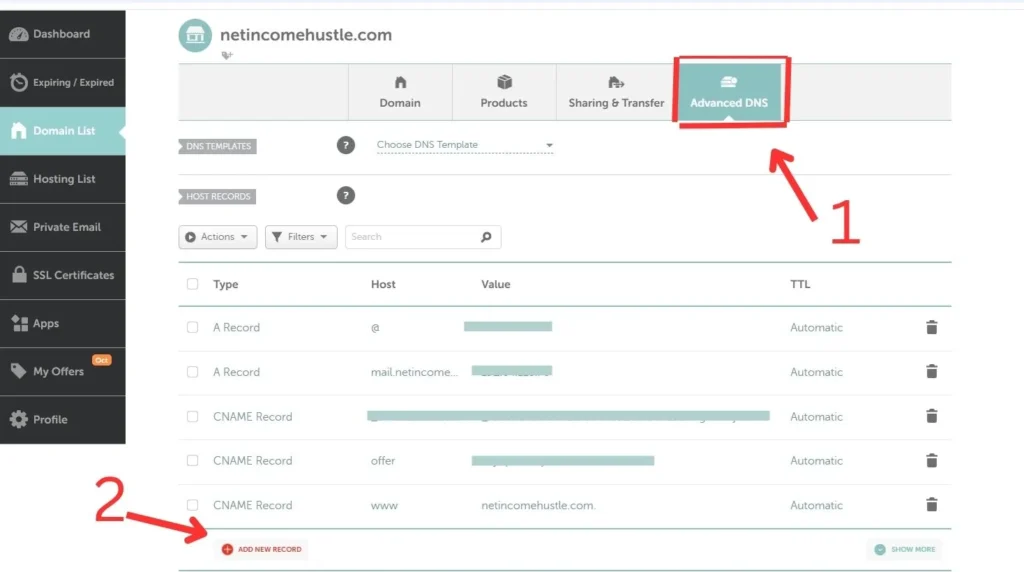
On the left sidebar, click “Domain List.” Locate the domain you’re authenticating and click manage.
Locate the “Advanced DNS” tab and click on it.
Under “HOST RECORDS,” go to the “ADD NEW RECORD” tab that has the red plus (+) sign. See number 2. Click on it to open the record fields where you must add the records generated from your Systeme.io account.
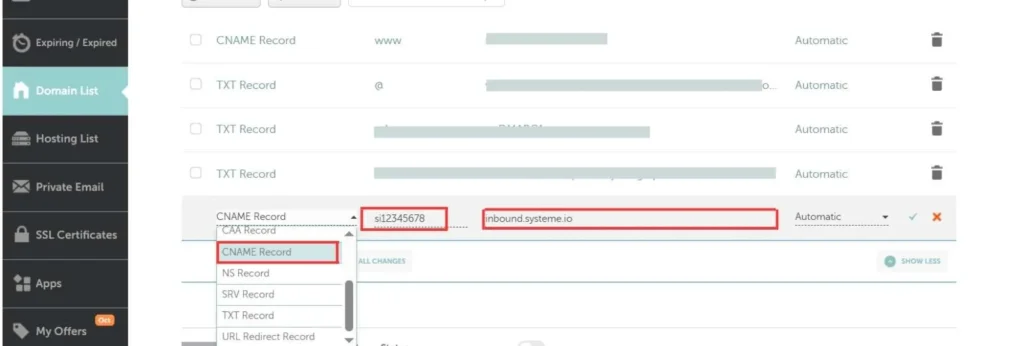
Now, this is where you should enter the records that systeme.io generated for you.
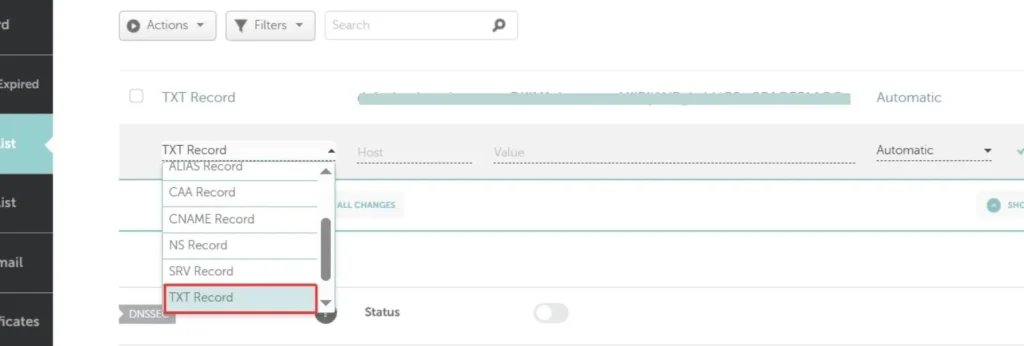
Select the appropriate record type in the dropdown.

Indicate the record type by following the example below.
For the type, choose CNAME, for the host field, copy the numbers, which are si11234567, but do not add the dot and your domain name. Just like this “si11234567”
Here’s how you should enter the three (3) CNAME records
NAME/HOST: si12345678 VALUE: inbound.systeme.io
NAME/HOST: systemeio1._domainkey VALUE: key1.systeme.io
NAME/HOST: systemeio2._domainkey VALUE: key2.systeme.io
Refer to the screenshot below. Confirm that the elements highlighted in red in the NAME section correspond to what you need to enter in the host field of your hosting account.
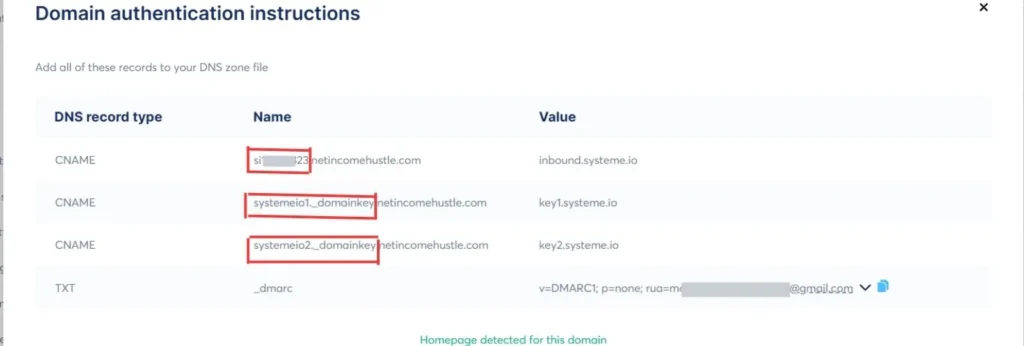
Similarly, check the value field. Ensure that the elements highlighted in red in your systeme.io account correspond to what is entered in the value field of your hosting account.
Next, you will add the DMARC record. Unlike the previous steps, this requires adding a TXT record.”
Enter the record in the format below.
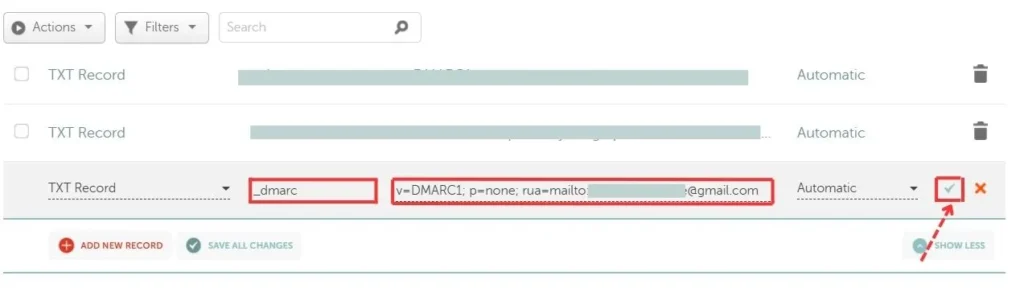
NAME: _dmarc
VALUE: v=DMARC1; p=none; rua=mailto:example@gmail.com
After adding these records, click the checkmark highlighted in red to save them.
How to Know if Your Domain Authentication Worked
In your systeme.io account, navigate to the menu section, locate the profile icon, and select “Settings” from the dropdown.
In the left sidebar, click “Emails” and find the “Domains” section.
If the authentication was successful, the status of your domain will go from “pending” to “verified.” But if it shows “pending” after 48 hours, it means there’s still an error, which signals that domain authentication wasn’t successful.
You can also verify your domain authentication using a third-party DNS tool, like DNS checker. Enter the CNAME record name (e.g., “si12345678.tutorial.com”), select CNAME as the record type, and click “search.” A green checkmark indicates proper configuration.
Repeat this process for the remaining two CNAME records.
Pro Tips for Better Email Deliverability
- Always use a branded business email address to send emails. Example: you@yourdomain.com. Avoid using personal or free emails like Gmail/Yahoo.
- Avoid using words in your email subject lines that may be perceived as spammy.
- Avoid sending bulk email messages when your domain is new. It’s important to build trust with your audience by starting with a smaller volume of messages and gradually increasing the quantity over time. Example: Week 1: 10-20/daily, Week 2: 50-100/day, Week 3: 200+ gradually.
- Maintain a healthy text-to-link ratio. Avoid embedding too many links in your content, as this may be viewed as spam. Limit to a maximum of two links per 100 words, and ensure you have one clear Call to Action (CTA).
- Aim to engage your audience with messages that resonate with them, as email providers monitor engagement. You will appear legitimate when recipients click, read, and respond to your emails, rather than ignoring or deleting them.
- Monitor bounce and spam complaints. Check your systeme.io email stats regularly. If you notice a high complaint or bounce rate, stop sending emails and fix the issue first.
Common Systeme.io Errors and How to Fix Them
Domain Not Verified (Incorrect DNS Record Type—TXT vs. CNAME).
This issue occurs if the DNS records were not added correctly in your hosting account (where you purchased your domain). For example, there may be a mismatch between a CNAME record and a TXT record.
DNS Propagation Delay
Even when correctly added, DNS propagation may take some time. DNS can take 5 minutes to 4 hours. It can even take up to 24 hours.
- Fix: Wait for propagation. Don’t try to delete and re-add, or else you will start the process again.
Wrong Value Pasted
Don’t paste the values with spaces or line breaks.
- Fix: Please paste exactly what systeme.io provided you, without any edits, spaces, or line breaks.
Emails Not Sending
This issue arises when a custom email is not used. It is important to avoid using Gmail or Yahoo Mail for verification attempts. Systeme.io mandates the use of a custom email to ensure better security and improve email deliverability.
- Fix: Use a custom email for email verification.
SPF not found / SPF failed
You can’t have multiple SPF in a single domain. Only one is allowed. If you already have something like
v=spf1 include:mail.systeme~all and v=spf1 include:zoho.com ~all
- Fix: Combine them both. Example: v=spf1 include:mail.systeme.io include:zoho.com ~all
Then delete the separate old SPF.